A radiator that is hot at the bottom and cold at the top has air trapped inside it. Learning how to bleed a radiator fixes that in about five minutes per unit. Air rises to the top of the radiator and blocks hot water from filling the upper section. Consequently, you pay to heat a radiator that only works at half capacity. This guide explains how to bleed a radiator safely and in the right order.
Signs a Radiator Needs Bleeding
- The bottom is hot but the top stays cold
- You hear gurgling, banging or trickling sounds
- The radiator takes much longer to warm up than others
- Some rooms never reach temperature
- The boiler runs constantly without satisfying the thermostat
Note that the opposite pattern means something different. A radiator that is hot at the top and cold at the bottom usually has sludge buildup, which needs flushing rather than bleeding.
What You Need
- A radiator bleed key, which costs very little at any hardware store
- A small bowl or jug
- Old towels or rags
- Gloves
- A flathead screwdriver, for some modern valves
Step 1: Turn the Heating On and Find the Cold Spots
Run the heating for about twenty minutes so every radiator reaches full temperature.
Then go round the house and feel each one carefully, from the bottom up to the top. Note which radiators have cold upper sections. Doing this first means you only bleed the ones that need it.
Step 2: Switch the Heating Off and Let It Cool
This step is essential for safety. Bleeding a hot system sprays scalding water.
Switch the heating off at the thermostat or boiler, then wait until the radiators are cool enough to touch comfortably. Thirty minutes to an hour is usually enough.
Turning the system off also lets the circulating pump stop, so air settles at the top of each radiator rather than moving around the pipework.
Step 3: Work From the Lowest Floor Upward
Order matters, and people often get it wrong. Start with radiators on the ground floor, then move upstairs.
Air naturally rises, so bleeding downstairs first pushes remaining air up to the top of the system where you release it last. Within each floor, start with the radiator furthest from the boiler.
Step 4: Open the Bleed Valve
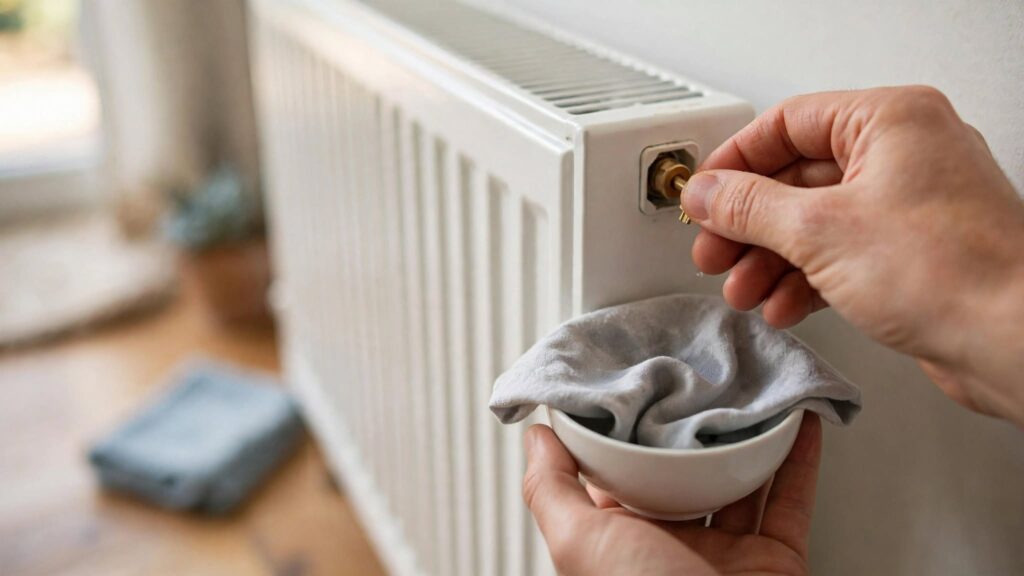
Find the bleed valve at the top of the radiator, usually at one end. It looks like a small square or slotted spindle inside a round opening.
- Hold the bowl beneath the valve and lay a towel on the floor.
- Fit the bleed key onto the spindle.
- Turn it slowly counter-clockwise, no more than a quarter to half a turn.
- You will hear a hiss as air escapes. Let it continue.
- When water starts to dribble out steadily rather than spitting, close the valve.
- Turn it clockwise until snug, but do not force it.
Do not open the valve fully, because it can come out entirely and release a lot of water very quickly.
Step 5: Repeat and Then Check the Pressure
Work through every radiator that had a cold top. After that, go back to the boiler.
Bleeding removes water as well as air, so system pressure drops. Check the pressure gauge on a sealed combi system. It should read between 1 and 1.5 bar when cold.
If it is low, top the system up using the filling loop beneath the boiler. Open both valves slowly, watch the gauge, then close them firmly once you reach the right pressure. Consult your boiler manual, since procedures vary.
Step 6: Reheat and Verify
Switch the heating back on and let it run for twenty minutes. Then feel each radiator again from bottom to top.
Every one should now be evenly warm. If a radiator is still cold at the top, bleed it once more, because large air pockets sometimes need two attempts.
Mistakes to Avoid
- Do not bleed radiators while the heating is running or hot.
- Do not open the valve more than half a turn.
- Do not over-tighten the valve afterwards, since that damages the seat.
- Do not forget to check and restore the boiler pressure.
- Do not bleed upstairs radiators before downstairs ones.
- Do not ignore black sludgy water, because that indicates corrosion inside the system.
If Bleeding Does Not Help
Several problems look similar but need different attention.
- Cold at the bottom, hot at the top. Sludge buildup. The system needs a power flush.
- Entirely cold radiator. A stuck thermostatic valve. Remove the head and press the pin to free it.
- Repeated air buildup. Air is entering somewhere, which suggests a leak or a failing automatic air vent. Get it investigated.
- Black water when bleeding. Internal corrosion. A technician should add inhibitor after flushing.
How Often to Bleed Radiators
Check them once a year, ideally in early autumn before heating season. That timing fits naturally with other preparation, and our guide on how to winterize your home covers the wider list.
Even heat distribution genuinely reduces energy use, because the boiler reaches target temperature faster and cycles less. The U.S. Department of Energy notes that properly maintained hydronic systems are among the most efficient heating options available. Our guides on the best thermostat temperature for winter and how to seal air leaks cover the other easy savings.
Final Thoughts
Now you know how to bleed a radiator correctly. Find the cold radiators while the system is hot, let everything cool, then work from the lowest floor upward with a bowl in hand. Finish by restoring the boiler pressure, and your whole heating system will work noticeably better.
Questions About How to Bleed a Radiator
Which order should I work in?
Lowest floor first, then upstairs. Air rises, so this pushes remaining air to the top of the system.
Should the heating be on or off?
Off and cool. Bleeding a hot system sprays scalding water.
Why has my boiler pressure dropped?
Because bleeding releases water as well as air. After you bleed a radiator, top the system back up to between 1 and 1.5 bar.
What if the top is hot and the bottom is cold?
That is sludge, not air. You cannot bleed a radiator to fix it, so the system needs flushing instead.